Create a New Gallery in Joomla
Galleries of images make a page look more professional and complete. A gallery is a collection of smaller images that might scroll or be displayed in a grid. Galleries and banners look great, but they require more work than regular images to setup.
While it is easy to add and remove gallery images with Widgetkit, setting up new image galleries requires a little more work. Follow these instructions closely. Don’t forget, you can call Techno Goober for help at (302) 645-7177 or email us for help.
Quick Access:
Open Widgetkit
To begin, log into Joomla, your content management system.
Step 1: Click the Components link at the top of your Content Management System window.
![]()
Step 2: Click the Modules link in the Extensions drop-down.

Add New Gallery
Step 1: Resize your desired Images.
Step 2: Navigate to Widgetkit.
Step 3: Click Gallery.

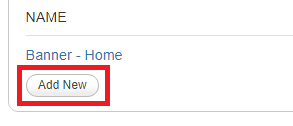
Step 4: While inside the Gallery, click Add New.
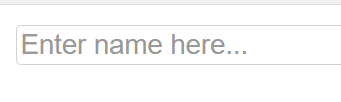
Step 5: Enter a title for your Gallery. Make it memorable or descriptive. It needs to be easy to understand what it is in the future.
Step 6: In the Folders window, click Create Folder.
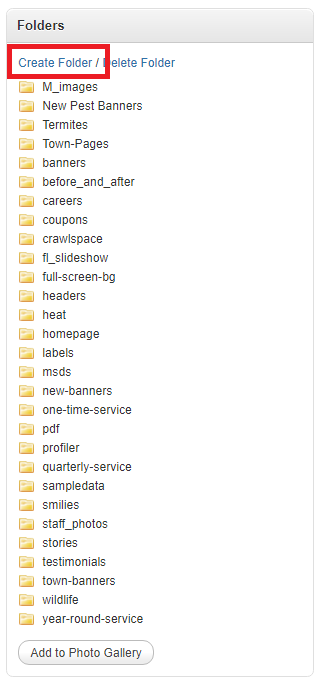
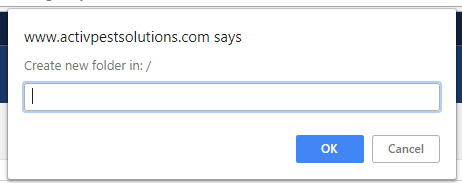
Step 7: A window will pop up saying Create New Folder in: / Enter in a folder name then click OK. Make it memorable so that you can easily understand what is in the future.
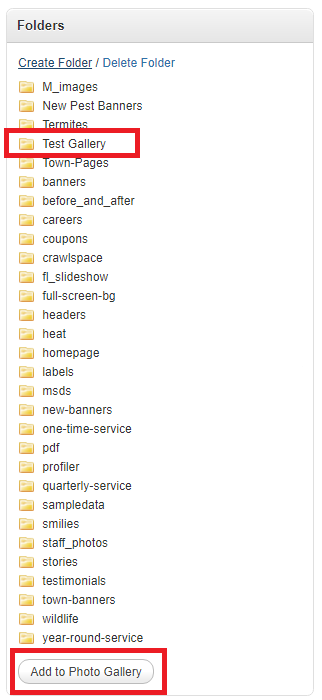
Step 8: A new folder will appear under the folder window. Click it to highlight and select Add to Photo Gallery.
Step 9: The folder will appear under your Title with the description Drop new images here to upload. You can drag and drop your resized images from your folder into this section.

Step 10: After adding your images, you will need to update the settings. If you have any questions about the settings, call or contact Techno Goober. You can also refer to another Gallery on your website to mimic other settings.
- Pick a Style – play around with the different styles to figure out which one looks best on your website.
- Width – this is referring to pixel width. A pixel is a form of measurement. Your site is 960 +/- pixel wide. Try different pixel widths and heights to achieve the desired effect or leave it set to Auto.
- Height – this is referring to pixel width. A pixel is a form of measurement. Your site is 960 +/- pixel wide. Try different pixel widths and heights to achieve the desired effect or leave it set to Auto.
- Autoplay – Do you want the gallery to automatically start playing or do you want the online audience to click to change the pictures on the site.
- Order – Default is the alpha order based on the naming convention of the photos.
- Autoplay Interval (MS) – 1000 milliseconds = 1 Second
- Effect Duration (MS) – based on the effect you will choose, this is how long you want the effect to last. Play around to get the desired effect.
- Start Index – Depending on the Style, you may want the slideshow to start on the 2nd, 3rd or 4th
- Slices – Used with certain effects to give the appearance of images being sliced. Best to play around with the effects and slices to get the desired effect.
- Effect – Integral part of being able to display galleries in different ways.
- Caption Animation Duration – You are able to add captions to photos. This will display the caption for X number of milliseconds.
- Lightbox – Enabled will allow for the photo to be enlarged if clicked on while the rest of the site is faded out.
Step 11: You are able to add captions to images in your Gallery. Additionally, you are able to add custom links for when users click the image.

Step 12: When you are done editing the Gallery, click Save.

Display new Gallery on Page
Step 1: Navigate to Widgetkit, then select Gallery.
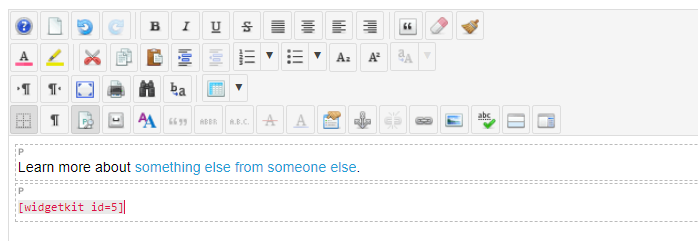
Step 2: Next to the name of the gallery is the Shortcode. Highlight and copy the Shortcode. In this example, it is widgetkit id=5 *Don’t forget the brackets. You need those for the code to work.

Step 3: Navigate to the page you would like to add the gallery to from the Article Manager. Click the title of the page to open it.
Step 4: Within the Editor, paste or type the shortcode that was associated with the gallery. i.e. widgetkit id=5 *Including Brackets
Step 5: Save Changes to the edited page by clicking Save.
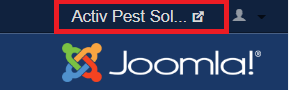
Step 6: Go to the front-end of the website to check out your work. To do this, you can click the name of your website in the top right corner of your screen.